Showing posts with label BSY. Show all posts

Monday, April 12, 2021

Bhramari Pranayama (humming bee breath)

Technique 1 


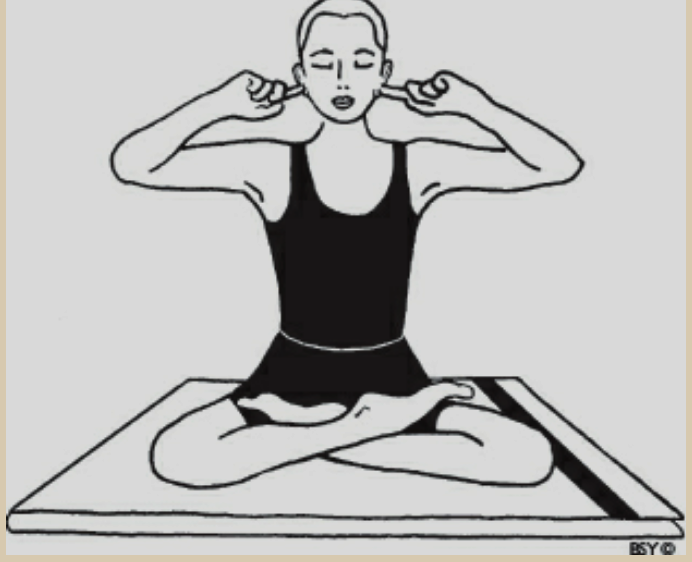
Sit in a comfortable meditation asana, preferably padmasana or siddha/siddha yoni asana with the hands resting on the knees in jnana or chin mudra. 

Close the eyes and relax the whole body. 

The lips should remain gently closed with the teeth slightly separated throughout the practice. This allows the sound vibration to be heard and felt more distinctly.

Raise the arms sideways and bend the elbows, bringing the hands to the ears. Use the index or middle fingers to plug the ears or the flaps of the ears may be pressed without inserting the fingers. 

Bring the awareness to the centre of the head, where ajna chakra is located, and keep the body absolutely still. 

Inhale through the nose. 

Exhale slowly and in a controlled manner while making a deep, steady humming sound like that of the black bee. 

The humming should be smooth, even and continuous for the duration of the exhalation. 

The sound should be soft and mellow, making the front of the skull reverberate. 

At the end of exhalation, the hands can be kept steady or returned to the knee and then raised again for the next round. 

The inhalation and exhalation should be smooth and controlled. This is one round.

Nadi Shodhana Pranayama - 4

Technique 4: Antar and Bahir Kumbhaka (internal and external retention) 

In this technique bahir kumbhaka or outer breath retention is introduced. Do not try to hold the breath outside for long at first, even though it may seem easy.

Nadi Shodhana Pranayama - 3

Technique 3: with Antar Kumbhaka (inner retention) 

In this technique antar kumbhaka or internal breath retention is introduced. The inhalation and exhalation should be silent, smooth and controlled. 


Stage 1: 

Begin with equal inhalation, inner retention and exhalation, using the ratio 1:1:1.

Close the right nostril and inhale slowly through the left nostril for a count of 5. 

At the end of inhalation, close both nostrils and retain the air in the lungs for a count of 5. 

Open the right nostril and exhale for a count of 5. 

At the end of exhalation, inhale through the right nostril for a count of 5, keeping the left nostril closed. 

Again, retain the breath for a count of 5 with both nostrils closed. 

Open the left nostril and exhale for a count of 5. 

This is one round using the ratio 5:5:5. 

Maintain constant awareness of the count and of the breath. 

Practise up to 10 rounds. 

Extension: After becoming comfortable with the count of 5:5:5, the breath and kumbhaka can be lengthened. Gradually increase the count by adding 1 unit to the inhalation, 1 unit to the retention and 1 unit to the exhalation. The count of one round will then be 6:6:6. 

When this has been perfected and there is no discomfort, increase the count to 7:7:7. 

Continue in this way until the count of 10:10:10 is reached. 

Do not force the breath. At the slightest sign of strain reduce the count. 


Stage 2: 

After perfecting the ratio of 1:1:1, increase the ratio to 1:1:2. 

Initially use a short count. Inhale for a count of 5, perform internal kumbhaka for a count of 5 and exhale for a count of 10. 

Extension: 

After mastering the count of 5:5:10, gradually increase the count by adding one unit to the inhalation, one unit to the retention and two units to the exhalation. 

The count of one round will then be 6:6:12. When this has been perfected and there is no discomfort, increase the count to 7:7:14. 

Gradually increase the count over several months of practice until the count of 10:10:20 is reached. 


Stage 3: 

Change the ratio to 1:2:2. 

Inhale for a count of 5, do internal kumbhaka for a count of 10 and exhale for a count of 10. 

Practise until the ratio is comfortable and there is no tendency to speed up the count during retention or exhalation due to shortness of breath. 

Extension: When this has been perfected, the count can be gradually increased by adding 1 unit to the inhalation, 2 units to the retention and 2 units to the exhalation. 

The count of one round will then be 6:12:12. 

In this manner, gradually increase the count to 10:20:20. 


Stage 4: 

The next ratio, 1:3:2, is intermediary. 

First reduce the count, inhale for a count of 5, do internal kumbhaka for a count of 15 and exhale for a count of 10. 

Practise until the ratio is comfortable and there is no tendency to speed up the count during retention or exhalation due to shortness of breath. 

Extension: 

When this has been perfected and there is no discomfort, the count can be gradually increased by adding 1 unit to the inhalation, 3 units to the retention and 2 units to the exhalation. 

The count of one round will then be 6:18:12. 

In this manner, gradually increase the count to 10:30:20. 


Stage 5: 

The final ratio is 1:4:2. 

Begin with 5:20:10. Once the ratio has been established, the count can gradually increase. 

Extension: 

Add 1 unit to the inhalation, 4 units to the retention and 2 units to the exhalation.

The count of one round will then be 6:24:12. 

In this manner, gradually increase the count to 10:40:20. 


Contra-indications: 

Technique 3 is not suitable for women in the later half of pregnancy. 

It is not recommended for people with heart problems, high blood pressure, emphysema or any major disorders. 

Stage 2 is not recommended for asthmatics. 


Benefits: 

The inner retention of breath, which characterizes technique 3, activates various brain centres and harmonizes the pranas. 

The benefits increase with the progression of the ratios. The ratio 1:4:2 is most widely recommended in the yogic texts. It gives profound psychological and pranic effects and is used as a preparation for kundalini awakening.
Friday, April 2, 2021

Nadi Shodhana Pranayama - 2

Technique 2: Alternate nostril breathing 

In this technique the basic pattern of alternate nostril breathing is established. 


Stage 1: 

Begin with equal inhalation and exhalation, using the ratio 1:1. 

Close the right nostril with the thumb and inhale through the left nostril. 

At the same time count mentally, “1, Om; 2, Om; 3, Om”, until the inhalation ends comfortably. This is the basic count. 

Breathe deeply without strain. 

Close the left nostril with the ring finger and release the pressure of the thumb on the right nostril. While exhaling through the right nostril, simultaneously count, “1, Om; 2, Om; 3, Om”. The time for inhalation and exhalation should be equal. 

Next, inhale through the right nostril, keeping the same count in the same manner. 

At the end of inhalation, close the right nostril and open the left nostril. 

Exhale through the left nostril, counting as before. 

This is one round. 

Practise 5 to10 rounds. 


Extension: 

After one week, if there is no difficulty, increase the length of inhalation and exhalation by one count. 

Continue to increase the count in this way until the count of 10:10 is reached. 

Do not force the breath in any way. 

Be careful not to speed up the counting during exhalation to compensate for shortage of breath. 

Reduce the count at the slightest sign of discomfort. 


Stage 2: 

After perfecting the above 1:1 ratio, it may be changed to 1:2. 

Initially halve the length of the inhalation. Inhale for a count of 5 and exhale for a count of 10. 

Repeat on the other side. 

This is one round. 

Practise 5 to10 rounds. 

Extension: 

During the ensuing months of practice, continue extending the breath by adding one count to the inhalation and two to the exhalation, up to the count of 10: 20. 

When this technique can be performed with complete ease, move on to technique 3. 


Contra-indications: 

Stage 2 of technique 2 begins the process of introversion, which is not recommended for a depressed or withdrawn person. The extension of stage 2, involving longer counts, is not recommended for people with heart problems. 


Benefits: 

Technique 2 gives more pronounced balancing of the breath and the brain hemispheres. It has calming effects and relieves anxiety, improves concentration and stimulates ajna chakra. 

The ratio 1:1 in stage 1 establishes a calming rhythm for the brain and heart, assisting people with cardiovascular and nervous disorders specifically, and stress-related conditions generally. 

As the count is extended, the breath slows down. The respiration becomes more efficient because the air flow is smoother and less turbulent. This ratio helps people with respiratory problems such as asthma, emphysema and bronchitis. 

The ratio 1:2 in stage 2 gives profound relaxation. The heartbeat and pulse rate slow, and blood pressure drops, but the extension of count should be built up slowly.

Nadi Shodhana Pranayama - 1

Technique 1: Preparatory practice 


Stage 1: 

Sit in any comfortable meditation posture, preferably siddha/siddha yoni asana or padmasana. 

Keep the head and spine upright. 

Relax the whole body and close the eyes. 

Practise yogic breathing for some time. 

Adopt nasagra mudra with the right hand and place the left hand on the knee in chin or jnana mudra. 

Close the right nostril with the thumb. 

Inhale and exhale through the left nostril 5 times. 

The rate of inhalation and exhalation should be normal. Be aware of each breath. 

After completing 5 breaths, release the pressure of the thumb on the right nostril and press the left nostril with the ring finger, blocking the flow of air. 

Inhale and exhale through the right nostril 5 times, keeping the respiration rate normal. 

Lower the hand and breathe 5 times through both nostrils together. 

This is one round. Practise 5 rounds or for 3 to 5 minutes, making sure that there is no sound as the air passes through the nostrils. 

Practise until this stage is mastered before commencing the next stage. 


Stage 2:

Begin to control the duration of each breath. 

Count the length of the inhalation and exhalation through the left, right and both nostrils. Breathe deeply without strain. 

While inhaling, count mentally, “1, Om; 2, Om; 3, Om”, until the inhalation ends comfortably. 

While exhaling, simultaneously count, “1, Om; 2, Om; 3, Om”. Inhalation and exhalation should be equal. 

Practise 5 rounds or for 3 to 5 minutes, making sure that there is no sound as the air passes through the nostrils. 


Extension: 

Notice that the length of the breath will spontaneously increase after some days of practice. 

When the count reaches 10 without any strain, go on to technique 2. 

Contra-indications: Nadi shodhana is not to be practised while suffering from colds, flu or fever. 

Benefits: Technique 1 increases awareness of and sensitivity to the breath in the nostrils. Minor blockages are removed and the flow of breath in both nostrils becomes more balanced. Breathing through the left nostril tends to activate the right brain hemisphere; breathing through the right nostril activates the left hemisphere. The long, slow, balanced breathing of stage 2 has profound effects, calming and balancing the energies. 

Practice note: Both nostrils must be clear and flowing freely. Mucous blockages may be removed through the practice of neti. If the flow of breath in the nostrils is unequal, it may be balanced by practising padadhirasana as a breath balancing technique (see Vajrasana Group of Asanas). Beginners should be familiar with abdominal breathing before taking up nadi shodhana.

Nasagra Mudra (nosetip position)


Hold the fingers of the right hand in front of the face. Rest the index and middle fingers gently on the eyebrow centre. Both fingers should be relaxed. The thumb is above the right nostril and the ring finger above the left. These two digits control the flow of breath in the nostrils by alternately pressing on one nostril, blocking the flow of breath, and then the other. The little finger is comfortably folded. When practising for long periods, the elbow may be supported in the palm of the left hand, although care is needed to prevent chest restriction.

Thursday, April 1, 2021

Yogic Breathing

Yogic breathing combines the previous three techniques - Abdominal, Thoracic, Clavicular. It is used to maximize inhalation and exhalation. Its purpose is to gain control of the breath, correct poor breathing habits and increase oxygen intake. It may be practised at any time and is especially useful in situations of high stress or anger for calming the nerves. 

However, while its inclusion in a daily yoga program will correct and deepen natural breathing patterns, yogic breathing itself should not be performed continually. 

Sit in a meditation posture or lie in shavasana and relax the whole body. 

Inhale slowly and deeply, allowing the abdomen to expand fully. 

Try to breathe so slowly that little or no sound of the breath can be heard. 

Feel the air reaching into the bottom of the lungs. 

At the end of abdominal expansion, start to expand the chest outward and upward. 

When the ribs are fully expanded, inhale a little more until expansion is felt in the upper portion of the lungs around the base of the neck. The shoulders and collar bone should also move up slightly. Some tension will be felt in the neck muscles. 

The rest of the body should be relaxed. 

Feel the air filling the upper lobes of the lungs. 

This completes one inhalation. 

The whole process should be one continuous movement, each phase of breathing merging into the next without any obvious transition point. There should be no jerks or unnecessary strain. The breathing should be like the swell of the sea. 

Now start to exhale. 

First, relax the lower neck and upper chest, then allow the chest to contract downward and then inward. 

Next, allow the diaphragm to push upward and toward the chest. 

Without straining, try to empty the lungs as much as possible by drawing or pulling the abdominal wall as near as possible to the spine. 

The entire movement should be harmonious and flowing. Hold the breath for a few seconds at the end of exhalation. This completes one round of yogic breathing. 

At first perform 5 to 10 rounds and slowly increase to 10 minutes daily. 

Relax any effort and once again watch the spontaneous breathing pattern. 

Bring the awareness back to observing the physical body as a whole. Be aware of the surroundings and gently open the eyes. 

Practice note: The main requirement in pranayama is that respiration be comfortable and relaxed. Consequently, once awareness and control of the breathing process has been established, the clavicular technique is dropped and yogic breathing is modified to become a combination of abdominal and thoracic breathing. The breath should flow naturally and not be forced.

Clavicular breathing

Clavicular breathing is the final stage of total ribcage expansion. It occurs after the thoracic inhalation has been completed. In order to absorb a little more air into the lungs, the upper ribs and the collar bone are pulled upwards by the muscles of the neck, throat and sternum. This requires maximum expansion on inhalation and only the upper lobes of the lungs are ventilated. In daily life, clavicular breathing is only used under conditions of extreme physical exertion and when experiencing obstructive airway diseases such as asthma. 

Lie in shavasana and relax the whole body. 

Maintain unbroken awareness of the natural breath for some time, concentrating on the sides of the chest. 

Perform thoracic breathing for a few minutes. 

Inhale, fully expanding the ribcage. 

When the ribs are fully expanded, inhale a little more until expansion is felt in the upper portion of the lungs around the base of the neck. The shoulders and collar bone should also move up slightly. 

This will take some effort. 

Exhale slowly, first releasing the lower neck and upper chest, then relaxing the rest of the ribcage back to its starting position. 

Continue for a few more breaths, observing the effect of this type of breathing. 

Relax any effort and once again watch the spontaneous breathing pattern. 

Bring the awareness back to observing the physical body as a whole. Be aware of the surroundings and gently open the eyes.

Thoracic breathing

Thoracic breathing utilises the middle lobes of the lungs by expanding and contracting the ribcage. It expends more energy than abdominal breathing for the same quantity of air exchange. It is often associated with physical exercise and exertion, as well as stress and tension; when combined with abdominal breathing, it helps the body to obtain more oxygen. However, the tendency in many people is to continue this type of breathing instead of abdominal breathing long after the stressful situation has passed, creating bad breathing habits and continued tension. 


Sit in a meditation posture or lie in shavasana and relax the whole body. 

Maintain unbroken awareness of the natural breath for some time, concentrating on the sides of the chest. 

Discontinue any further use of the diaphragm and begin to inhale by slowly expanding the ribcage. 

Feel the movement of the individual ribs outward and upward, and be aware of this expansion drawing air into the lungs. 

Expand the chest as much as possible. 

Exhale by relaxing the chest muscles. Feel the ribcage contracting and forcing the air out of the lungs. 

Breathe slowly and deeply through the chest with total awareness. Do not use the diaphragm. 

Continue thoracic breathing for a few minutes, pausing slightly after each inhalation and exhalation. 

Relax any effort and once again watch the spontaneous breathing pattern. 

Bring the awareness back to observing the physical body as a whole. Be aware of the surroundings and gently open the eyes.

Wednesday, March 31, 2021

Abdominal Breathing

Abdominal or diaphragmatic breathing is practised by enhancing the action of the diaphragm and minimising the action of the ribcage.The diaphragm is a domed sheet of muscle that separates the lungs from the abdominal cavity and, when functioning correctly, promotes the most efficient type of breathing. It is the effect of the diaphragm rather than the diaphragm itself that is experienced as the stomach rises and falls, but sensitivity will come with practice. During inhalation the diaphragm moves downward, pushing the abdominal contents downward and outward. During exhalation the diaphragm moves upward and the abdominal contents move inward. 

Movement of the diaphragm signifies that the lower lobes of the lungs are being utilized. The proper use of the diaphragm causes equal expansion of the alveoli, improves lymphatic drainage from basal parts of the lungs, massages the liver, stomach, intestines and other organs that lie immediately beneath it, exerts a positive effect on the cardiac functions and coronary supply, and improves oxygenation of the blood and circulation. 

Abdominal breathing is the most natural and efficient way to breathe. However, due to tension, poor posture, restrictive clothing and lack of training, it is often forgotten. 

Once this technique again becomes a part of daily life and correct breathing is restored, there will be a great improvement in the state of physical and mental wellbeing. 

Abdominal (or diaphragmatic) breathing 

Lie in shavasana and relax the whole body. 

Place the right hand on the abdomen just above the navel and the left hand over the centre of the chest. 

Observe the spontaneous breath without controlling it in any way. Let it be absolutely natural. 

To practise abdominal breathing, feel as though you are drawing the energy and breath in and out directly through the navel. 

The right hand will move up with inhalation and down with exhalation. The left hand remains almost still. 

Let the abdomen relax. Do not try to force the movement in any way. 

Do not expand the chest or move the shoulders. 

Feel the abdomen expanding and contracting. 

Continue breathing slowly and deeply.


Inhale while expanding the abdomen as much as is comfortable, without expanding the ribcage. 

At the end of the inhalation, the diaphragm will be compressing the abdomen and the navel will be at its highest point. 

On exhalation, the diaphragm moves upward and the abdomen moves downward. At the end of the exhalation, the abdomen will be contracted and the navel compressed towards the spine. 

Continue for a few minutes. 

Relax any effort and once again watch the spontaneous breathing pattern. 

Bring the awareness back to observing the physical body as a whole. 

Be aware of the surroundings and gently open the eyes.

General notes for the Pranayama practitioner

In the traditional texts, there are innumerable rules and regulations pertaining to pranayama. The main points are to exercise moderation, balance and common sense with regard to inner and outer thinking and living. However, for those who seriously wish to take up the advanced practices of pranayama, the guidance of a guru or competent teacher is essential. 


Contra-indications: Pranayama should not be practised during illness, although simple techniques such as breath awareness and abdominal breathing in shavasana may be performed. Carefully observe the contra-indications given for individual practices. 

Time of practice: The best time to practise pranayama is at dawn, when the body is fresh and the mind has very few impressions. If this is not possible, another good time is just after sunset. Tranquillizing pranayamas may be performed before sleep. Try to practise regularly at the same time and place each day. Regularity in practice increases strength and willpower as well as acclimatizing the body and mind to the increased pranic force. Do not be in a hurry; slow, steady progress is essential. 

Bathing: Take a bath or shower before commencing the practice, or at least wash the hands, face and feet. Do not take a bath for at least half an hour after the practice to allow the body temperature to normalize. 

Clothes: Loose, comfortable clothing made of natural fibres should be worn during the practice. The body may be covered with a sheet or blanket when it is cold or to keep insects away. 

Empty stomach: Practise before eating in the morning or wait at least three to four hours after meals before starting pranayama. Food in the stomach places pressure on the diaphragm and lungs, making full, deep respiration difficult. 

Diet: A balanced diet of protein, carbohydrates, fats, vitamins and minerals is suitable for most pranayama practices. A combination of grains, pulses, fresh fruit and vegetables, with some milk products if necessary, is recommended. 

When commencing pranayama practice, constipation and a reduction in the quantity of urine may be experienced. In the case of dry motions, stop taking salt and spices, and drink plenty of water. In the case of loose motions, stop the practices for a few days and go on a diet of rice and curd or yoghurt. 

The more advanced stages of pranayama require a change in diet and a guru should be consulted for guidance on this. 

Place of practice: Practise in a quiet, clean and pleasant room, which is well ventilated but not draughty. Generally, avoid practising in direct sunlight as the body will become overheated, except at dawn when the soft rays of the early morning sun are beneficial. Practising in a draught or wind, in air-conditioning or under a fan may upset the body temperature and cause chills. 

Breathing: Always breathe through the nose and not the mouth unless specifically instructed otherwise. Both nostrils must be clear and flowing freely. Mucous blockages may be removed through the practice of neti or kapalbhati. If the flow of breath in the nostrils is unequal, it may be balanced by practising padadhirasana as a breath balancing technique. 

Sequence: Pranayama should be performed after shatkarmas and asanas, and before meditation practice. Nadi shodhana pranayama should be practised in each pranayama session as its balancing and purifying effects form the basis for successful pranayama. After practising pranayama, one may lie down in shavasana for a few minutes. 

Sitting position: A comfortable, sustainable meditation posture is necessary to enable efficient breathing and body steadiness during the practice. Siddha/siddha yoni asana or padmasana are the best postures for pranayama. The body should be as relaxed as possible throughout the practice with the spine, neck and head erect. Sit on a folded blanket or cloth of natural fibre to ensure the maximum conduction of energy during the practice. Those who cannot sit in a meditation posture may sit against a wall with the legs outstretched or in a chair which has a straight back. 

Avoid strain: With all pranayama practices, it is important to remember that the instruction not to strain, not to try to increase your capacity too fast, applies just as it does to asana practice. If one is advised to practise a pranayama technique until it is mastered, and it can be practised without any strain or discomfort, it is wise to follow that instruction before moving on to a more advanced practice or ratio. Furthermore, breath retention should only be practised for as long as is comfortable. The lungs are very delicate organs and any misuse can easily cause them injury. Not only the physical body, but also the mental and emotional aspects of the personality need time to adjust. Never strain in any way. 

Side effects: Various symptoms may manifest in normally healthy people. These are caused by the process of purification and the expulsion of toxins. Sensations of itching, tingling, heat or cold, and feelings of lightness or heaviness may occur. Such experiences are generally temporary, but if they persist, check with a competent teacher. Energy levels may increase or fluctuate; interests may change. If such changes cause difficulty in lifestyle, decrease or stop the practice until a competent teacher or guru gives guidance.

Natural Breathing

This is a simple technique which introduces practitioners to their own respiratory system and breathing patterns. It is very relaxing and may be practised at any time. Awareness of the breathing process is itself sufficient to slow down the respiratory rate and establish a more relaxed rhythm. 


Natural breathing 

Sit in a comfortable meditation posture or lie in shavasana and relax the whole body. 

Observe the natural and spontaneous breathing process. 

Develop total awareness of the rhythmic flow of the breath. 

Feel the breath flowing in and out of the nose. 

Do not control the breath in any way. 

Notice that the breath is cool as it enters the nostrils and warm as it flows out. 

Observe this with the attitude of a detached witness. 

Feel the breath flowing in and out at the back of the mouth above the throat. 

Bring the awareness down to the region of the throat and feel the breath flowing in the throat. 

Bring the awareness down to the region of the chest and feel the breath flowing in the trachea and bronchial tubes. 

Next, feel the breath flowing in the lungs. 

Be aware of the lungs expanding and relaxing. 

Shift the attention to the ribcage and observe the expansion and relaxation of this area. 

Bring the awareness down to the abdomen. Feel the abdomen move upward on inhalation and downward on exhalation. 

Finally, become aware of the whole breathing process from the nostrils to the abdomen and continue observing it for some time. 

Bring the awareness back to observing the physical body as one unit and open the eyes.